TABLE OF CONTENTS
- 1. Antennas
This guide provides a comprehensive overview of the Antenna feature, detailing its core functionalities, interface components, and methods of adding new Antennas.
1. Antennas
In the "Antennas " tab, you will find a list of all Antennas configured on your system.
- Click on 'Antennas '

Displaydata Antenna: The new tab opens as shown below:
1.1 Core Functions of the Antennas window
- Global Search: Find records by keyword.
- Filter: Refine entries by specific criteria.
- +Add: Create a new communicator.
- Column Filter & Sorting: Show specific rows and sort data.
- Records: Displays total entries shown.
- Column Settings: Customize visible columns.
1.1.1 Columns and Overview
- Serial Number: Unique device ID.
List of Antennas: View all devices in the system. - Type: Dynamic Communicator or Range Extender.
Dynamic Communicator: Serves as the master antenna; cannot be deleted.
Range Extender: Boosts coverage beyond the master Antenna's reach. - Hostname: Local IP; customizable for enterprise setups.
- Name: Editable label for store location.
- Channel: Editable and must differ among nearby Antennas to avoid interference.
- Configuration Role: Defines each Antenna’s function.
- Enabled: Indicates active / Disabled - inactive status.
- Status: Confirmed
- Operational Status: Shows if the communicator is online, initializing, or disconnected.
- Operational: Online and functioning.
- Initializing: Starting up or resynchronizing.
- Disconnected: No server communication—check power and internet.
Hanshow Antenna: 3 columns displayed as listed; other fields match Displaydata.

- Visual ID: A unique ID that is shown on the physical antenna, and allows only between 01-99
- Listen Port: It's the entry point. Once the Antenna is connected, the session moves to a dedicated port, allowing the server to listen for the next client.
- AP Version: Shows the firmware version of the Antenna
Inline Editing:
- Double-click a row to edit/Click on 'Edit' icon (4) as shown in the screenshot above.
- Name and Visual ID columns are enabled for editing - Hanshow.
- Name and Channel columns are enabled for editing - Displaydata.
OBS: Displaydata - Check the Antenna for the following:
Ensure the green indicator light remains steadily lit.

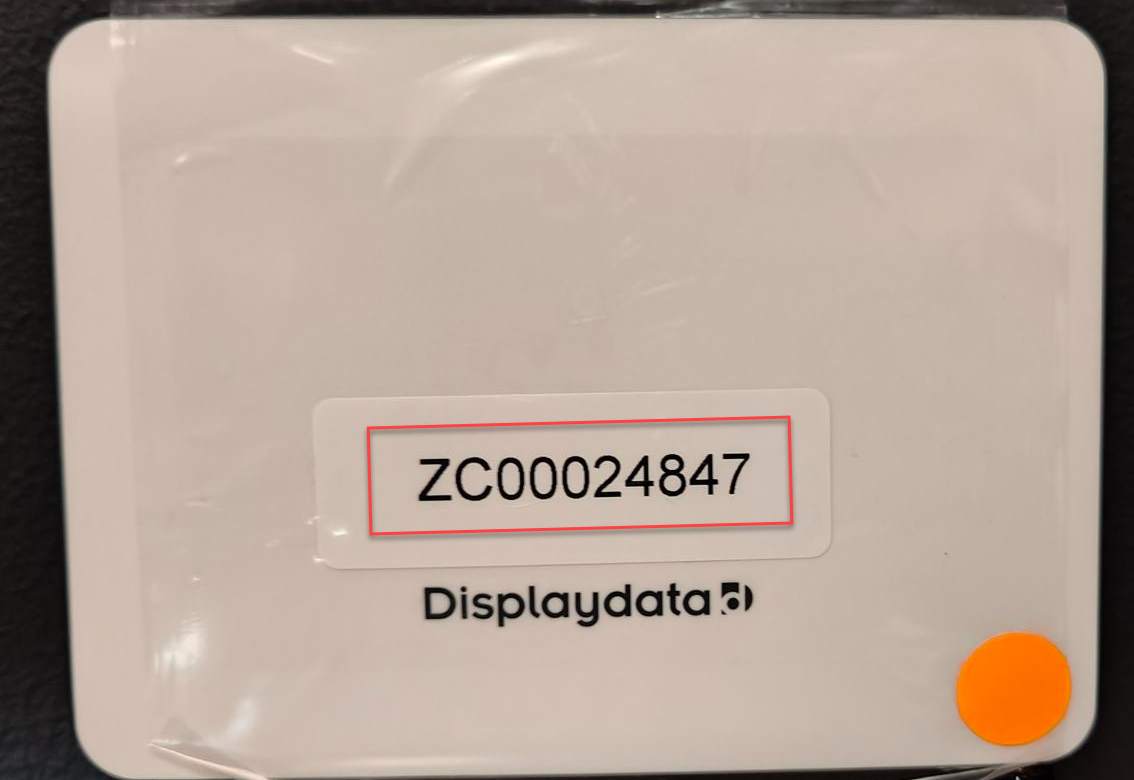
Serial Number - The serial number can be found on the front and on the back of the antenna
When the plastic slider is taken off (see pictures below)
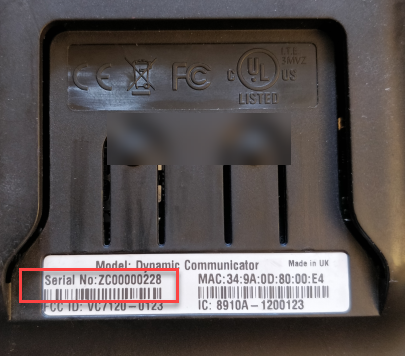
OrangeDot -The orange dot indicates when the antenna is the Master antenna
Hanshow Antenna:
Check the Antenna for the following:
Ensure the green indicator light remains steadily lit.
Visual ID is shown on the Antenna as shown below.
1.2 Inline edit of 'Name' and 'Channel'
- Double-click on either the 'Name' or 'Channel' column
Both are editable.
- Make changes to 'Name' or 'Channel' as needed.
- Verify the updated values in the Antennas list.
The edits to 'Name' or 'Channel' will be saved automatically.

Hanshow: Name/Visual ID editable and savable.
1.3 How to add /create Antennas :
- Click on '+Add' as shown below.

A slide-in opens as shown below:
 If you click 'Displaydata',
Opens a slide-in titled "Add Antennas" as shown below.
- Slide-in Title: "Create Antennas"
- Serial Number Field: Enter the Antenna’s serial number
- Add Icon (+): Used to add a new Antenna
- File Icon: Represents file-related actions or uploads
- Antenna List: Shows added entries
- Create Button: Enabled when ready to add
- Cancel Button: Closes without saving
If you click 'Hanshow',
Opens a slide-in titled "Add Antennas" as shown below.
1. Serial Number field: Enter the antenna ID.
2. Copy‑paste icon: Copy and paste antenna IDs.
Note: The Remaining fields and processes are identical to Displaydata.
1.3.1 Process flow - Add Antenna using '+' in the Slide-in
- Click '+Add' beside Global search.
Opens a slide-in titled "Create Antennas ".
- Type the serial number of the Antenna.
- Click '+'

The Antenna's serial number appears below, confirming it's ready for addition and included in the list.
Note: Follow the same steps for each of the (X) Antennas.
'Create' button becomes active
- Click 'Create'.
The slide-in closes automatically.
- Review the Antenna list to confirm the newly added device
The Antenna has been added successfully and now appears in the list.
1.3.2 Process flow - Add Antennas using 'File upload' in the Slide-in
- Click '+' beside Global search.
Opens a slide-in titled "Create Antennas".
- Click the 'File upload' icon.
- Upload the file with a list of range extenders.

The Antenna's serial number appears below, confirming it's ready for addition and included in the list.
The Create' button becomes active
- Click 'Create'.
The slide-in closes automatically.
- Review the Antenna list to confirm the newly added devices
The range extenders have been added successfully and now appear in the Antenna list.
OBS: Hanshow: Copy‑paste icon available; process same as Displaydata.
2. Row actions
Displaydata:
- Click on the 3 dots (row actions) of a Dynamic Antenna.
Opens a dropdown with various functions as shown below.

Note: Disconnect and Clear Queue options are unavailable for Range Extenders.
Hanshow Antenna:
- Click on the 3 dots (row actions) of the Antenna.
Opens a dropdown with 'Details' as shown below.

2.1 Details
Displaydata Antenna:
- Click on ‘Details’
The Details slide-in opens with three tabs—Overview, Connectivity, and Logs—automatically opening to the Overview tab, as illustrated below.
2.1.1 Overview
This tab opens by default when 'Details' is selected and displays the following fields.

- Slide-in Title: Shows Antenna details by serial number
- Tabs: Overview, Connectivity, and Logs.
- Navigation: Arrow icons switch Antennas without leaving the page
- Menu actions (⋮): Includes actions like Request Logs, Transfer Configuration Role, Disable Transmission, and Delete.
- Edit Icon: Edit Name and Channel fields.
- Basic: Name and Transmission settings.
- Type: Communicator Type, Channel, and Configuration Role.
- Status: Operational Status, Firmware Version, Last Synchronization, and Last Broadcast Refresh.
Hanshow Antenna:
- Click on ‘Details’
The Details slide-in opens with three tabs—Overview, Connectivity —automatically opening to the Overview tab, as illustrated below.

- Slide-in Title: Shows Antenna details by Antenna ID
- Tabs: Overview, Connectivity
- Basic: Name, Channel, Visual ID, Serial number of the Antenna.
- Status: Connection Status, Firmware Version.
- Menu actions (⋮): Includes actions like Delete.
- Edit Icon: Edit Name and Visual fields.
2.1.1.1 How to edit Name and Channel - Antenna
1. Click on ‘Details’
The Details slide-in opens with three tabs—Overview, Connectivity, and Logs—automatically opening to the Overview tab
2. Click on the ‘Edit’ icon in the 'Overview' tab as shown below.
A slide-in opens as shown below.
3. Edit 'name' and 'Channel'.'
4. Click 'Save'.
The edited and saved 'Name' and 'Channel' can be seen in the 'Overview' slide-in.
OBS: Hanshow: Visual ID replaces Channel.
2.1.2 Connectivity:
- Click on 'Connectivity'.
Shows the following information as shown below.

- Tabs: The Connectivity tab is active.
- Navigation: Arrow icons switch Antennas without leaving the page
- Menu Actions (⋮): Request Logs, Transfer Configuration Role, Disable Transmission, and Delete.
- Edit Icon: Modify Name and Channel.
- Network Settings: Discovery Mode and Host Name.
- Statistics: Displays Count, RSSI, and Packet Error.
- Connection History: Timestamps of past connections.
OBS :Hanshow: Network settings include Local IP and history.
2.1.3 Logs:
- Click on 'Logs'.
Shows the following information as shown below.
Bug regarding timestamp: needs to update the screenshot after fix.
- Tabs: The Logs tab is active.
- Navigation: Arrow icons switch Antennas without leaving the page.
- Menu Actions (⋮): Request Logs, Transfer Configuration Role, Disable Transmission, and Delete.
- Communicator logs: Status, timestamp, file name, and a download icon that can be clicked to download the file.
- See all logs: Link to full log overview page (see Request Logs section).
2.1.4 Menu actions:
OBS: Hanshow: Only the Delete function is supported.
Menu actions are accessible across all three tabs—Overview, Connectivity, and Logs.
- Click the options icon (⋮)
Opens a dropdown with Request Logs, Transfer Configuration Role, Disable Transmission, and Delete.

The communicator’s status can be modified using Transfer Configuration Role, Disable Transmission, or Delete.
2.1.4.1 Request logs
- Click ‘Request logs.
Opens a slide in – Antenna logs with Request logs, status, time, file name, and tab ‘See all logs’
Bug on this - Needs to update the screenshots as request logs function is not working as of now.

- Click on 'See all logs'.
Opens a tab with logs as shown below.

Name of the tab: Logs
Communicator - The unique serial number identifying a specific communicator or range extender device.
Global search: A search bar that scans all log entries across multiple fields for matching keywords.
Filter: A tool to narrow down log results based on specific criteria like date, status, or device.
+Request logs: A button to initiate a new log request from a selected communicator or range extender.
Column settings: Options to customize which columns are visible and how they’re arranged in the log table.
Records: The total number of log entries currently displayed or available in the table.
File name: The name assigned to the log file, often reflecting its source or timestamp.
Status: Indicates the current state of the log process (e.g., pending, in progress, completed, failed).
Created: The date and time when the log request was initially generated.
Started: The timestamp marking when the log collection process began.
Status time: The most recent time the log’s status was updated.
Completed: The timestamp showing when the log collection process finished successfully or failed.
2.1.4.2 Transfer Configuration role
This function initiates the transfer of the configuration role from one communicator or range extender to another.
- Click 'Transfer Configuration role' on the communicator/Range extender you want to transfer.
A confirmation box pops up as shown below.

- Click 'Yes'
A snack bar message pops up as shown below, confirming the transfer.

- Check the column 'Configuration role' on communicator/Range extender.
Shows 'Active in the column 'Configuration role'.
2.1.4.3 Disable transmission
An action of stopping a device or system from sending signals.
- Click 'Disable transmission' on the communicator/Range extender you want to disable.
A confirmation box pops up as shown below.

- Click 'Yes'
A snack bar message pops up, as shown below, confirming the disablement.

- Check the overview tab - field 'Transmission' under basic.
Transmission is 'Disabled' as shown below.

2.1.4.4 Delete
Removes the selected communicator from the system.
- Click 'Delete' on the Range extender you want to delete.
A confirmation box pops up as shown below.

- Click 'Yes'
A snack bar message pops up, as shown below, confirming the deletion.

- Reload the page and review the communicator list.
The range extender has been removed from the list.
Note: A dynamic communicator cannot be removed as long as range extenders are connected to it and displays are present in the installation.
OBS: Deletion Process is the same as Displaydata, but Hanshow antennas can be deleted even if displays are installed.
2.2 Logs
Records of events generated by systems to track what has happened over time.
- Select a range extender/communicator.
- Click row actions
- Click 'See all logs'.
Opens a tab with logs as shown below.
Bug on this - Needs to update the screenshots as request logs function is not working as of now.

Name of the tab: Logs
Communicator - Serial number of communicator or range extender.
Global search: Finds keywords across all log fields.
Filter: Refines results by date, status, or device.
+Request logs: Initiates a new log request.
Column settings: Adjust visible columns and layout.
Records: Total log entries shown or available.
File name: Name of the log file, often includes source or timestamp.
Status: Log progress (e.g., pending, in progress, completed, failed).
Created: When the log request was made.
Started: When log collection began.
Status time: Last update to the log’s status.
Completed: The timestamp showing when log collection finished or failed.
Back arrow icon: Returns to the communicator list.
OBS: Logs are not seen with the Hanshow Antenna
2.3 Ping
This function checks whether the antenna is currently online.
- Select a range extender/communicator.
- Click row actions.
- Click 'Ping'.
Opens a slide-in showing the serial number of the communicator/Range extender, status, and timestamp.
- Click 'Stop' tab at the bottom of the slide-in.
Ping action is stopped.
'Start' tab gets enabled as shown below.
2.4 Restart
This feature enables a restart of the communicator or range extender.
- Select a range extender/communicator.
- Click row actions.
- Click 'Restart'.
A snack bar message pops up, as shown below, confirming the process.
2.5 Disconnect
This action facilitates both disconnecting and reconnecting a dynamic communicator device.
- Select a dynamic communicator.
- Click row actions.
- Click 'Disconnect'.
A snack bar message pops up as shown below, confirming the disconnecting and reconnecting process.

2.6 Clear queue
This action helps to send a command to the communicator and clears the active job queue that are running on the communicator.
- Select a dynamic communicator.
- Click row actions.
- Click 'Clear queue'.
A confirmation box pops up as shown below.

A snack bar message pops up as shown below, confirming the process.