
TABLE OF CONTENTS
- Uploading marketing images
- Managing promotional videos
- Synchronizing media from external systems
- Reusing media across installations
Media
- Click 'Media' in the menu on the left side of the screen.
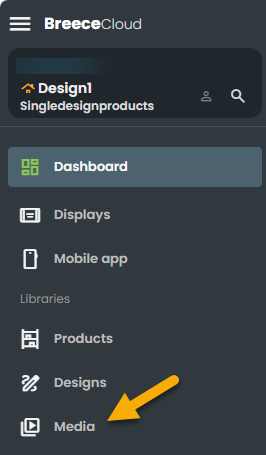
A list page opens as shown below.
1. Media - Overview
Typical Media Workflow
- Add a Provider or upload media manually.
- Verify the files appear in Images or Videos.
- Use the media in a Design.
- Sync providers when new content becomes available.
- Monitor Error Logs for synchronization issues.
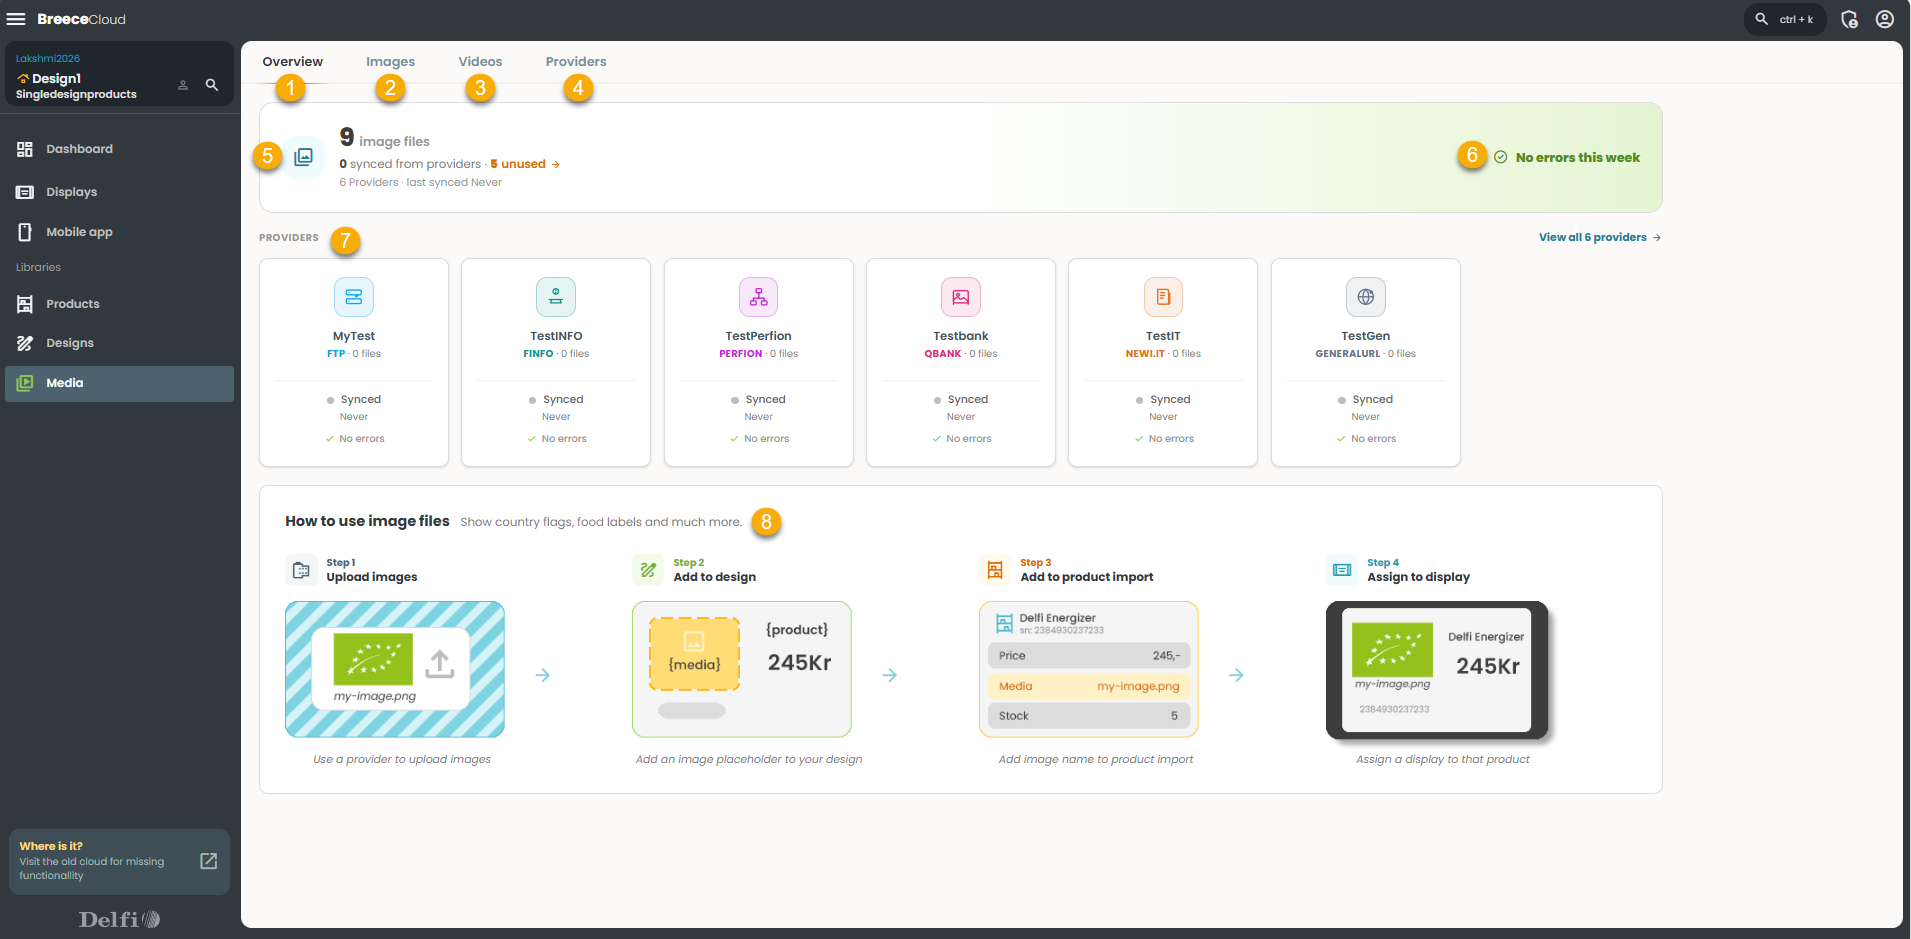
- Overview – Default tab showing a summary of the Media library.
- Images – manage image files.
- Videos – manage video files.
- Providers – Tab listing all connected media providers.
- Media files icon/count – Shows media files,with sync status ( synced, unused).
- Error alert bar – Shows errors (if present) found this week with provider icons and a "View error log" link.
- Providers – Preview cards for the connected providers.
- View all 7 providers – Link to see the full provider list.
- How to use media files – Step-by-step guide.
2. Media - Images
- Click on the 'Images' tab , displays the following as shown below.
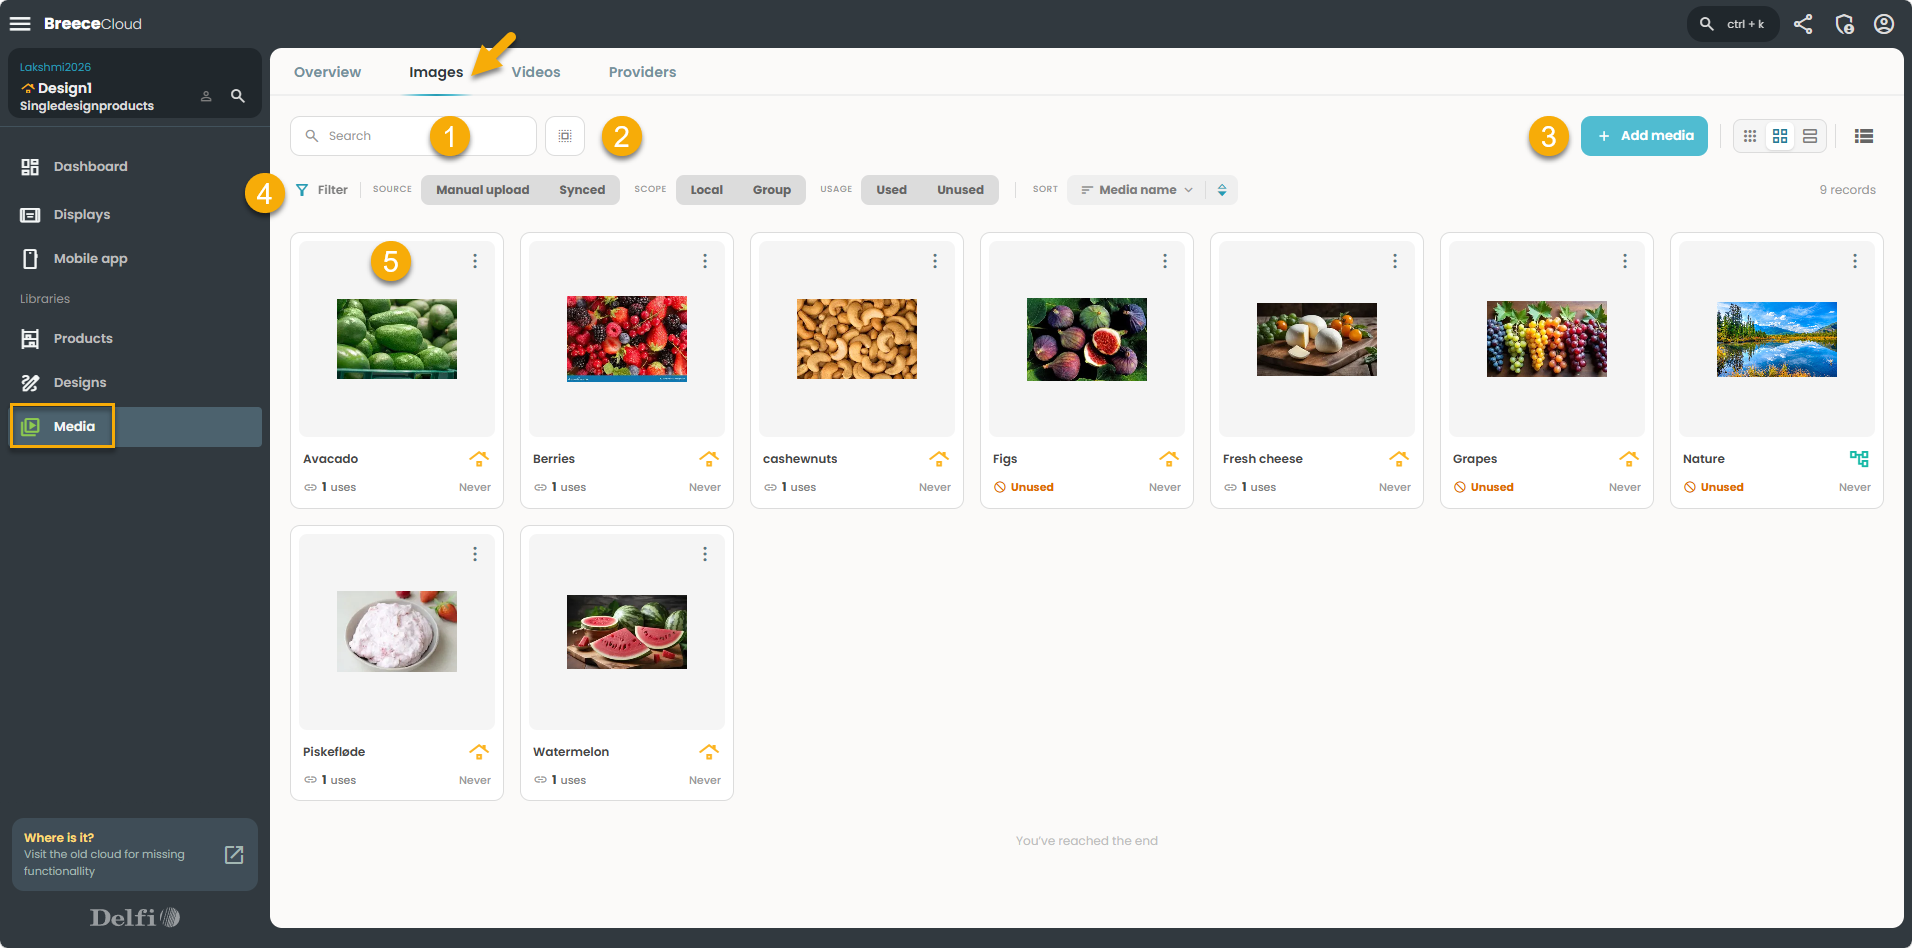
- Search bar : Search for a specific media file by name.
- Select all : Selects all the files in the page.
- Add media button : Upload new image files.
- Filter bar:Filter images by:
- Source: Manual upload or Synced
- Scope: Local or Group
- Usage: Used or Unused
- Sort : File extension, Source, Scope, Configuration name, Usages, Cache time.
5. Image grid : Each image card displays:
- Thumbnail preview
- File name
- Usage status
- Last synced status
- A three-dot menu for additional actions
- A small icon indicating scope (Local vs. Group)
Note:
Local - Media is only available in the current Installation.Group - Media is available across all Installations within the Group.
2.1 Images -Row actions
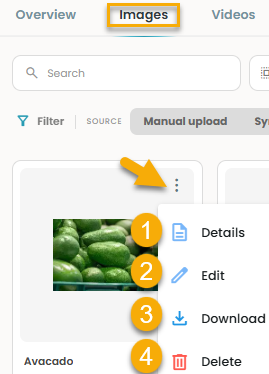
- Click on the (⋮) row actions of a image.
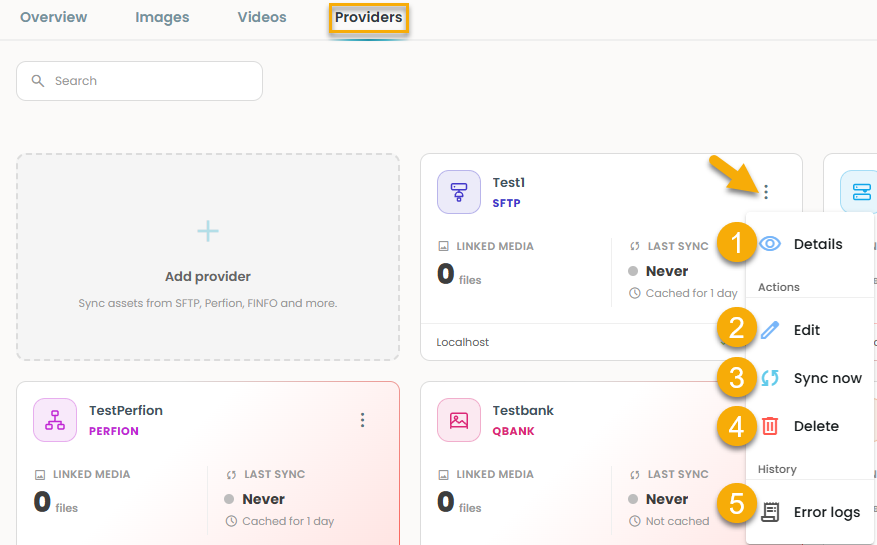
Opens 4 actions - Details, Edit, Download, Delete.
2.1.1 Details
- Click on the image or click on the (⋮) row actions of a image.
A slide-in opens as shown below.
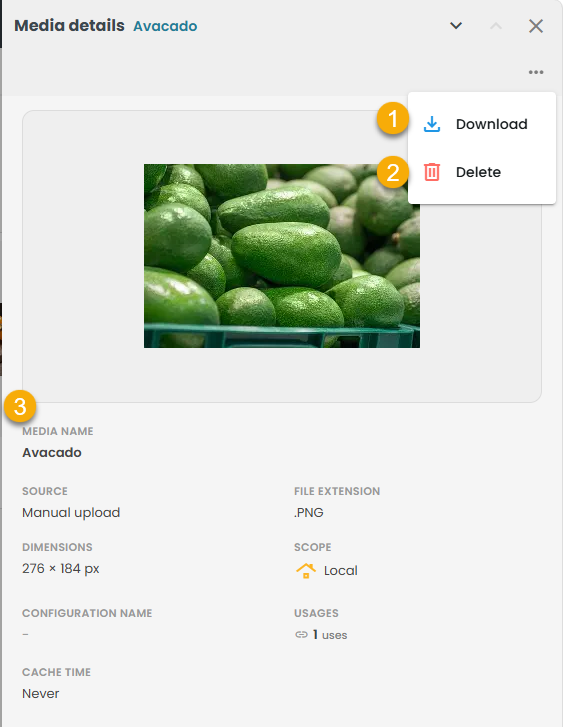
- Download : Option to download the image file.
- Delete : Option to delete the image file.
- Media details fields: displays the info about Media Name, Source, Dimensions, Configuration Name, Cache Time, File Extension, Scope, Usages.
2.1.2 Edit
- Click on the (⋮) row actions of a image.
- Click 'Edit'.
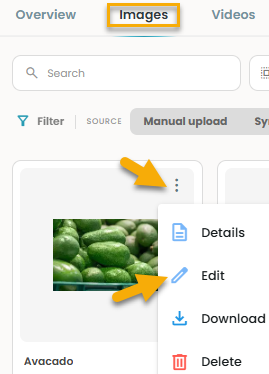
A slide-in opens as shown below.
2.1.3 Download
- Click 'Download'.
Downloads the Image so you can review or reuse the image.
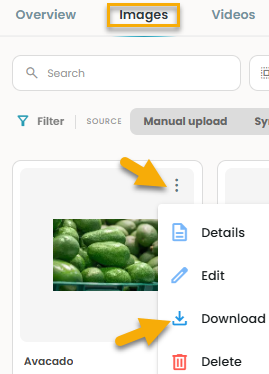
- Click 'Download'.
Downloads the Image so you can review or reuse the image outside the system.
2.1.4 Delete
- Click 'Delete'.
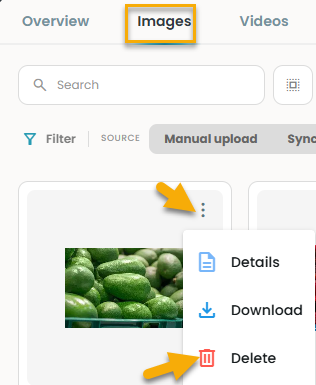
A confirmation message appears as shown below.
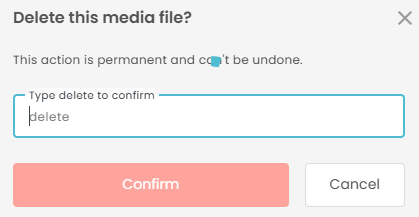
- Type' Delete'.
- Click 'Confirm'.
Removes the image from the list page, permanently deleting it from the Installation.
2.2 +Add Image
- Click '+Add image'.

Opens a slide-in as shown below.
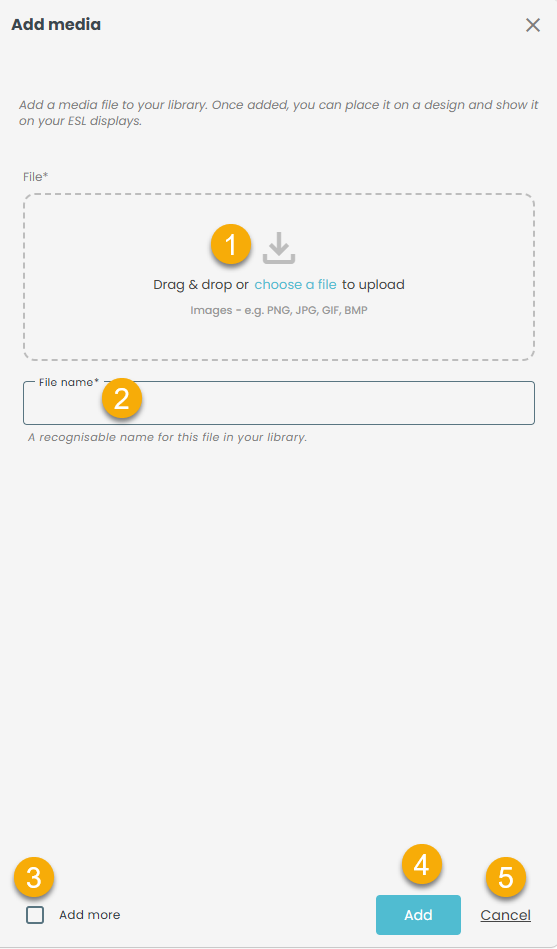
- File : Drag & drop or choose a file to upload (PNG, JPG, GIF, BMP).
- File name : Enter a name for the Image file.
- Add more : Keep dialog open to upload multiple image files.
- Add : Uploads the file.
- Cancel : Closes without adding.
After adding, image is added and can be seen the list page of Images.
3. Media - Videos
- Click on the 'Videos' tab , displays the following as shown below.
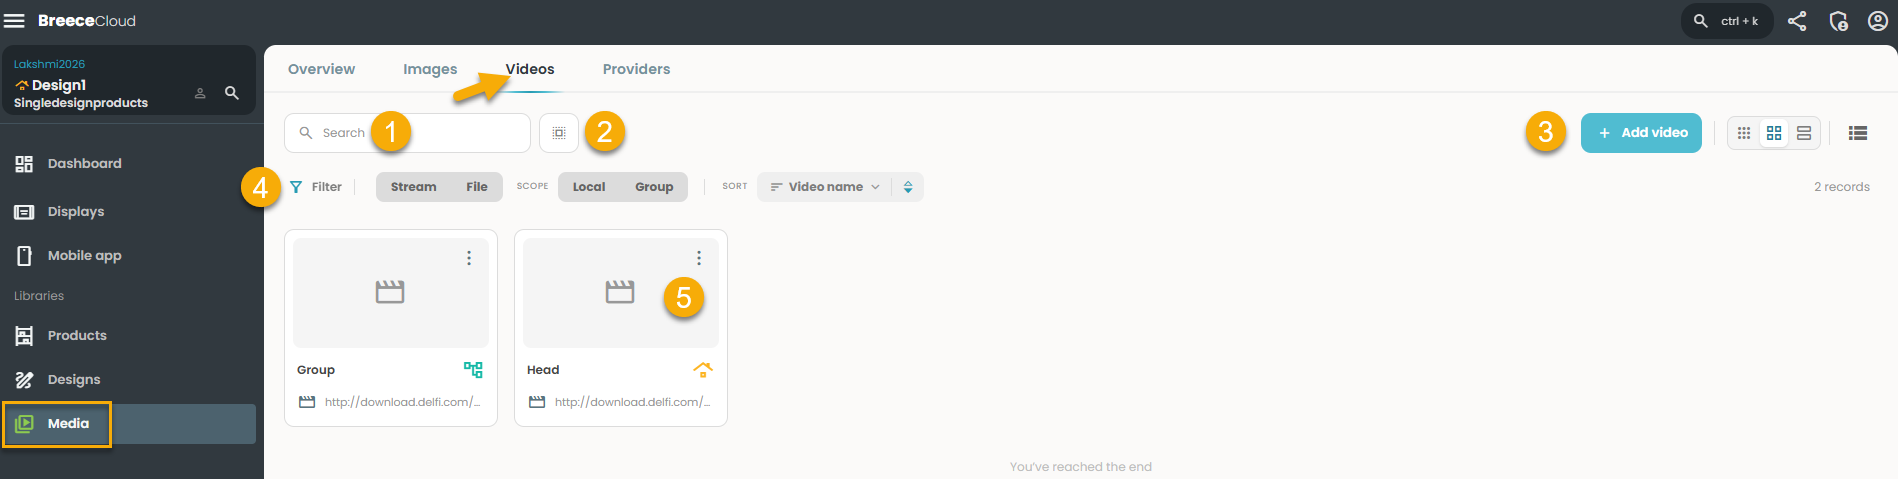
- Search bar – Search for a specific video by name.
- Select all : Selects all the video files in the page.
- Add video : Upload a new video file.
- Filter bar: Filter videos by:
- Source: Stream or File
- Scope: Local or Group
- Sort : Filepath, Type, Scope
- Video card– Each entry shows:
- Thumbnail placeholder (clapperboard icon)
- Video name
- Source URL
- Scope icon (Group or Local)
- Three-dot menu for additional actions
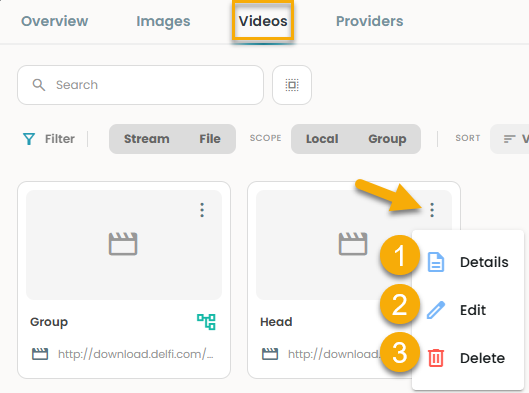
3.1 Videos - Row actions
- Click on the (⋮) row actions of a video.
Opens 3 actions - Details, Edit, Delete.
3.1.1 Details
- Click on the video or click on the (⋮) row actions of a video.
A slide-in opens as shown below.
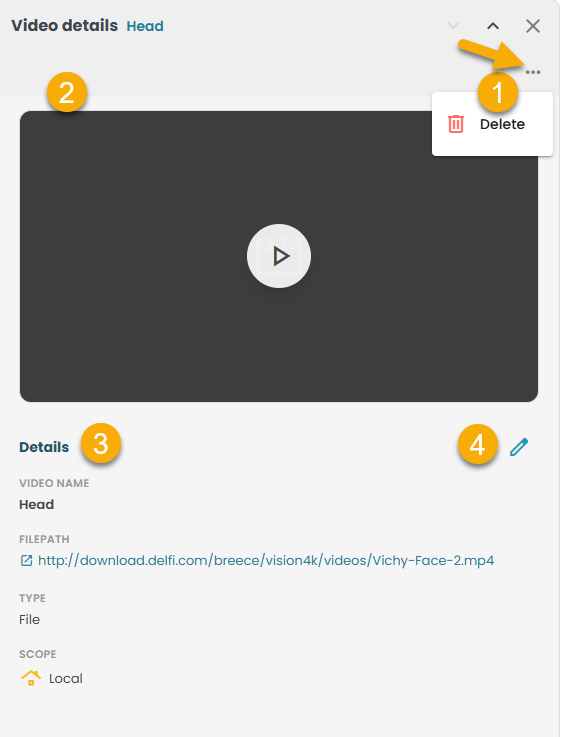
- Delete : Select to remove the video
- Video: Click play to preview the video.
- Details : Shows the video name, filepath, type, and scope.
- Edit: Edit the video name, filepath, and thumbnail.
3.1.2 Edit
- Click on the (⋮) row actions of a video.
Opens 3 actions - Details, Edit, Delete.
- Click 'Edit'
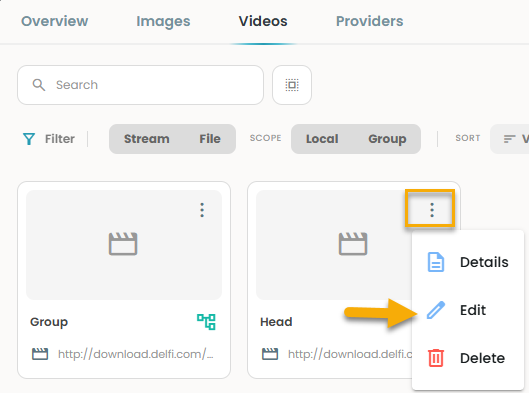
A slide-in opens as shown below:
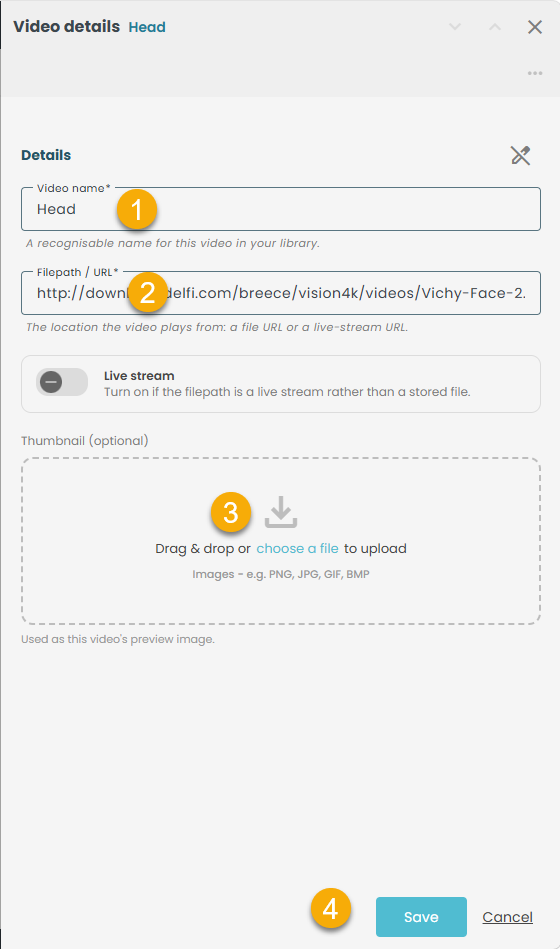
1. Video name : Enter a name for the video.
2. Filepath / URL : Enter the file or live-stream URL.
3. Thumbnail (optional) : Upload a preview image.
4. Save : Saves your changes. Cancel discards them.
3.1.3 Delete
- Click on the (⋮) row actions of a video.
Opens 3 actions - Details, Edit, Delete.
- Click 'Delete'
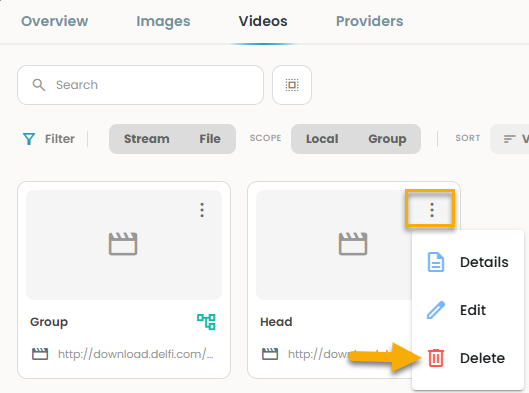
A confirmation message appears as shown below.
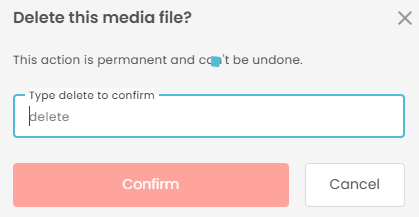
- Type' Delete'.
- Click 'Confirm'.
Removes the video from the list page, permanently deleting it from the Installation.
3.2 +Add Video
- Click '+Add video'

A slide-in opens as shown below:
1. Video name : Enter a name for the video.
2. Filepath / URL : Enter the file or live-stream URL.
3. Thumbnail (optional) : Upload a preview image.
4. Save : Saves your changes. Cancel discards them.
4. Providers
Providers are the sources or platforms from which media is integrated or imported.
- Click on the 'Providers' tab , displays the following as shown below.
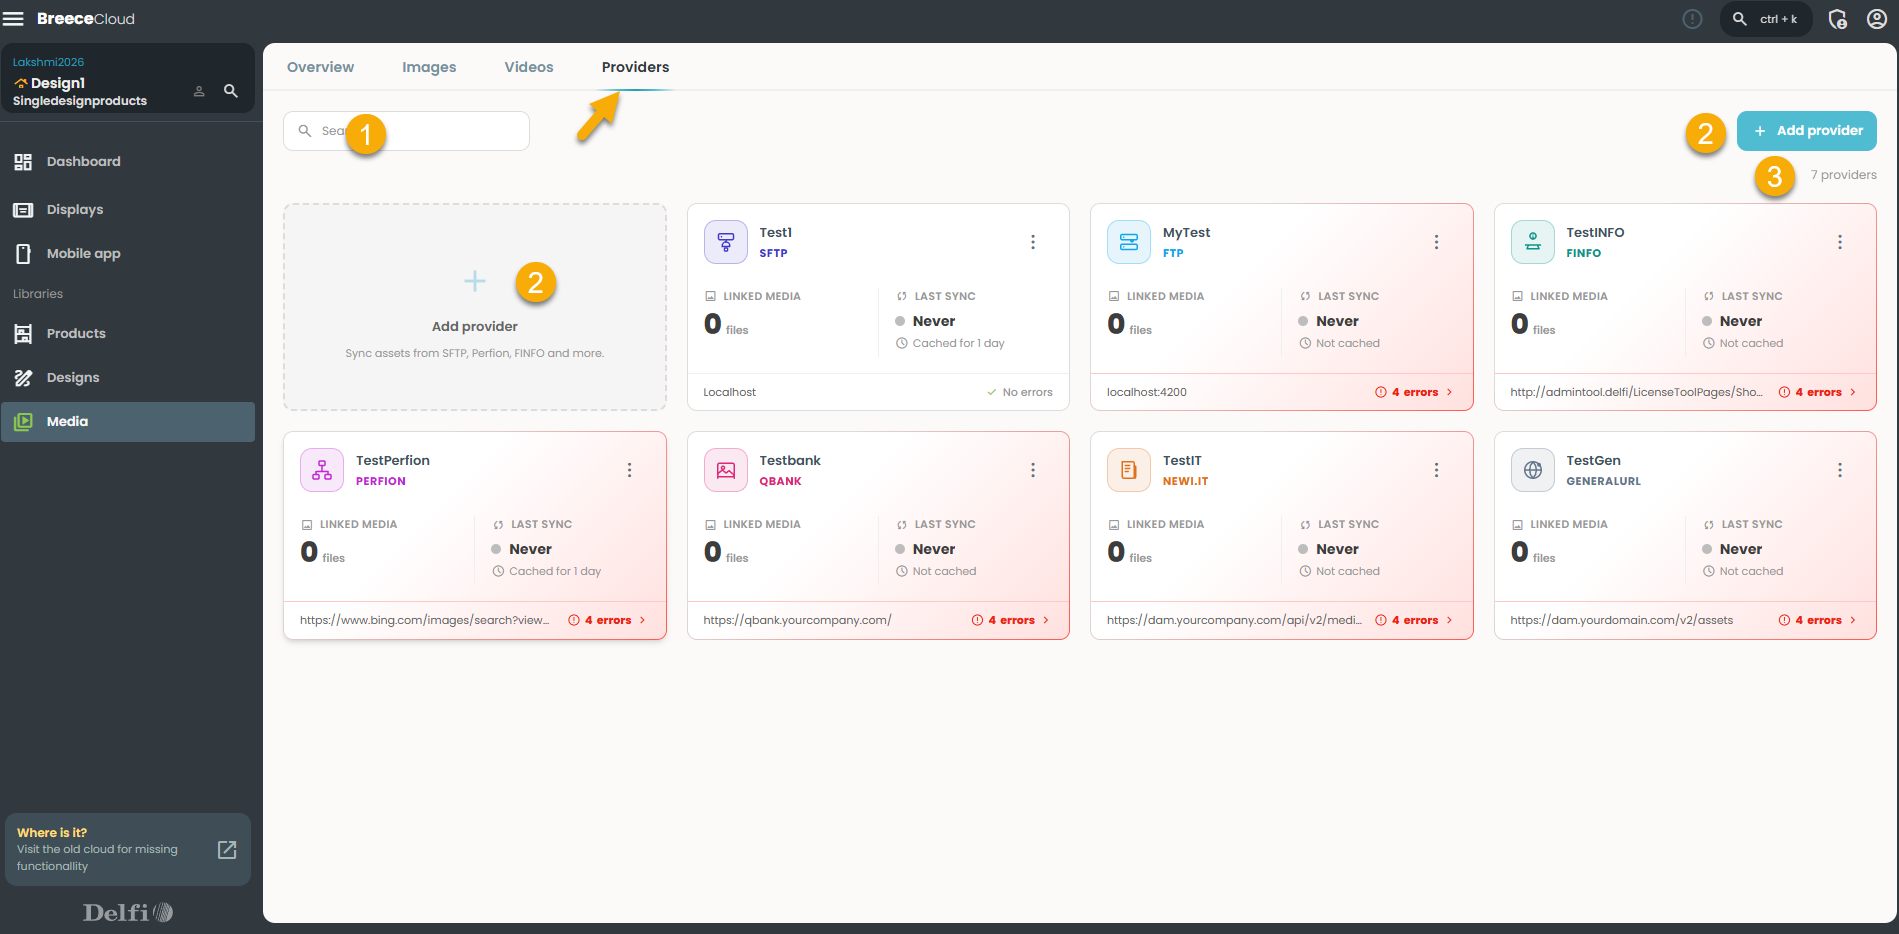
1. Search : Filter the list by provider name.
2. Add provider : Adds a new provider (available as a tile or button).
3. Provider count : Total providers listed
4.1 Providers - Row actions
- Click on the (⋮) row actions of a provider.
A list page opens as shown below.
4.1.1 Details
- Click on the (⋮) row actions of a provider.
- Click 'Details'.
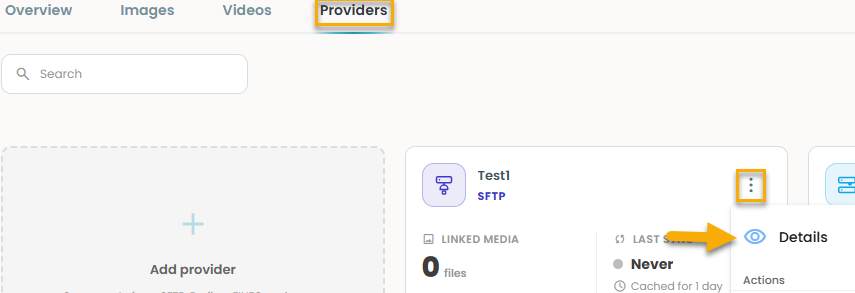
A slide-in opens as shown below.
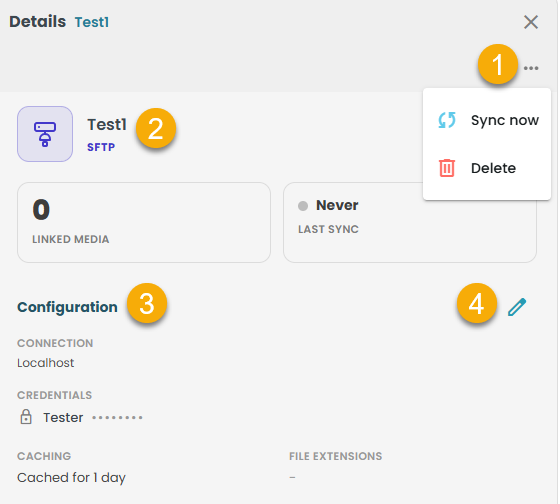
1. Options menu (⋯) : Sync now or Delete.
2. Provider summary : Shows the provider name, type, linked media count, and last sync.
3. Configuration : Shows connection, credentials, caching, and file extensions.
4. Edit : Edit the configuration settings.
4.1.2 Edit
- Click on the (⋮) row actions of a provider.
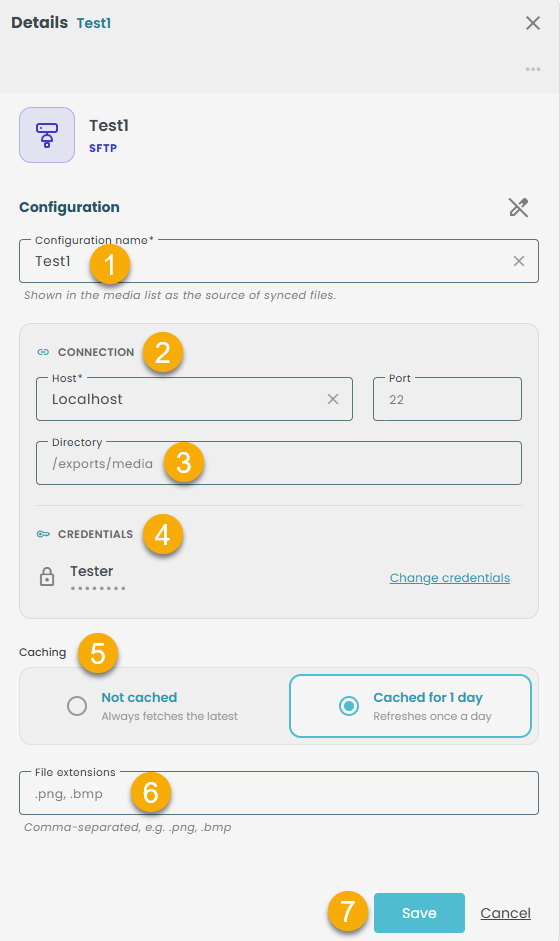
- Click 'Edit'.
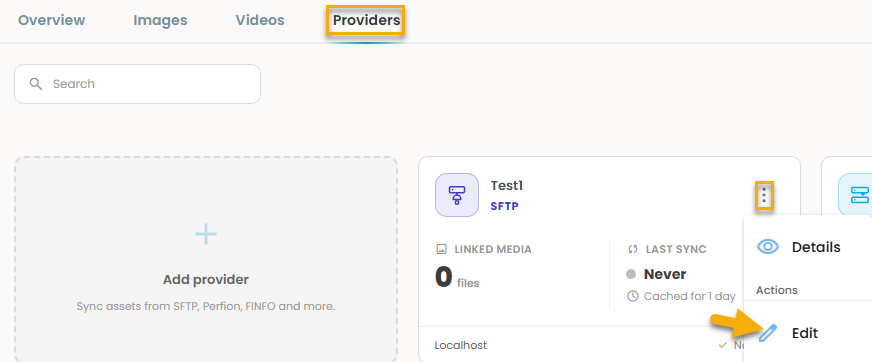
A slide-in opens as shown below.
4.1.3 Sync now
- Click on the (⋮) row actions of a provider.
- Click 'Sync now'.
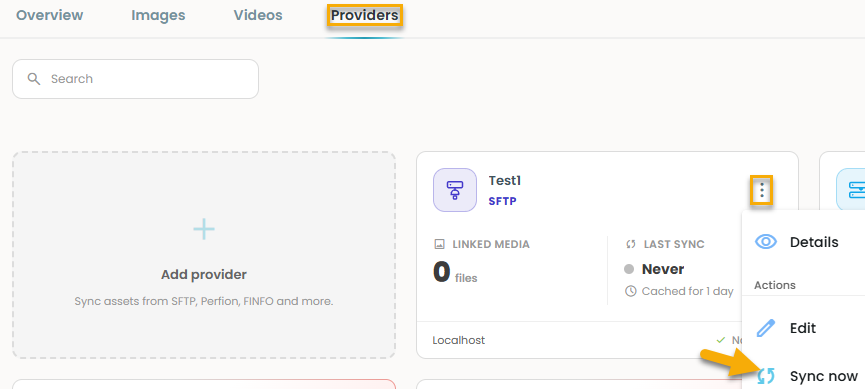
A snack bar message pops up saying ' Sync started for 'xxxx'.
4.1.4 Delete
- Click on the (⋮) row actions of a provider.
- Click 'Delete'.
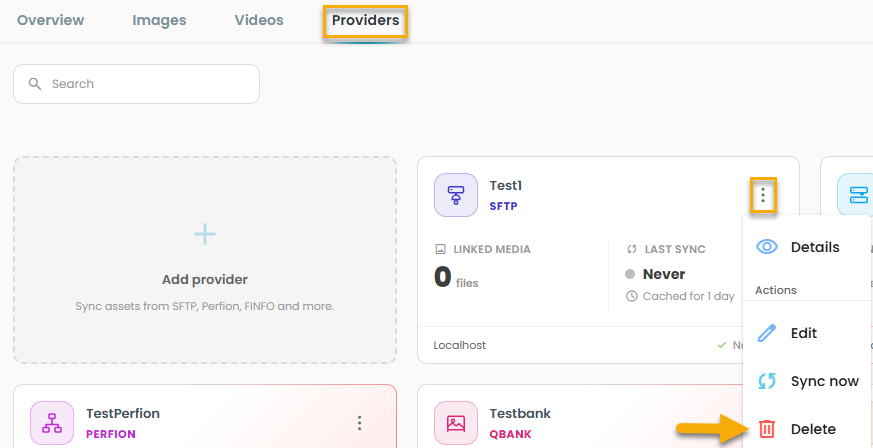
A confirmation message appears as shown below.
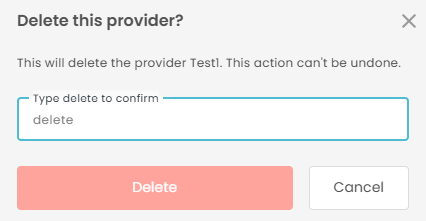
- Type' Delete'.
- Click 'Confirm'.
Removes the provider from the list page, permanently deleting it from the Installation.
4.1.5 Error logs
- Click on the (⋮) row actions of a provider.
- Click 'Error logs'.
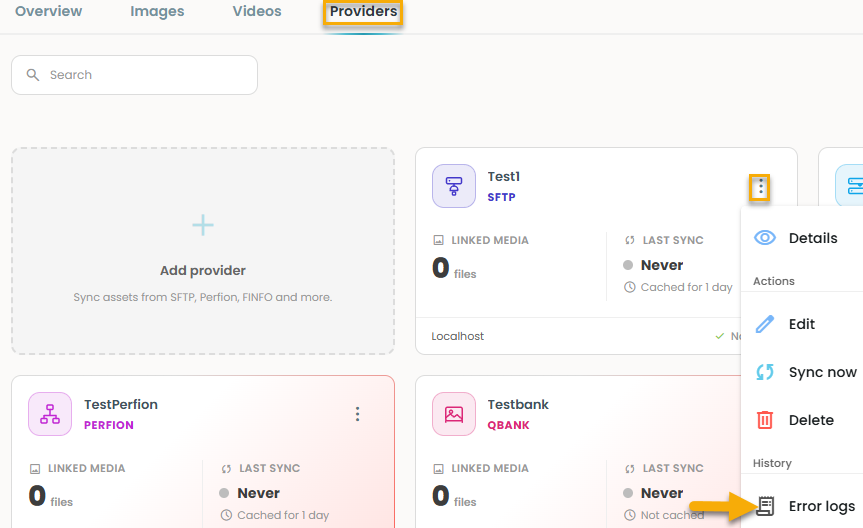
A list page opens as shown below:
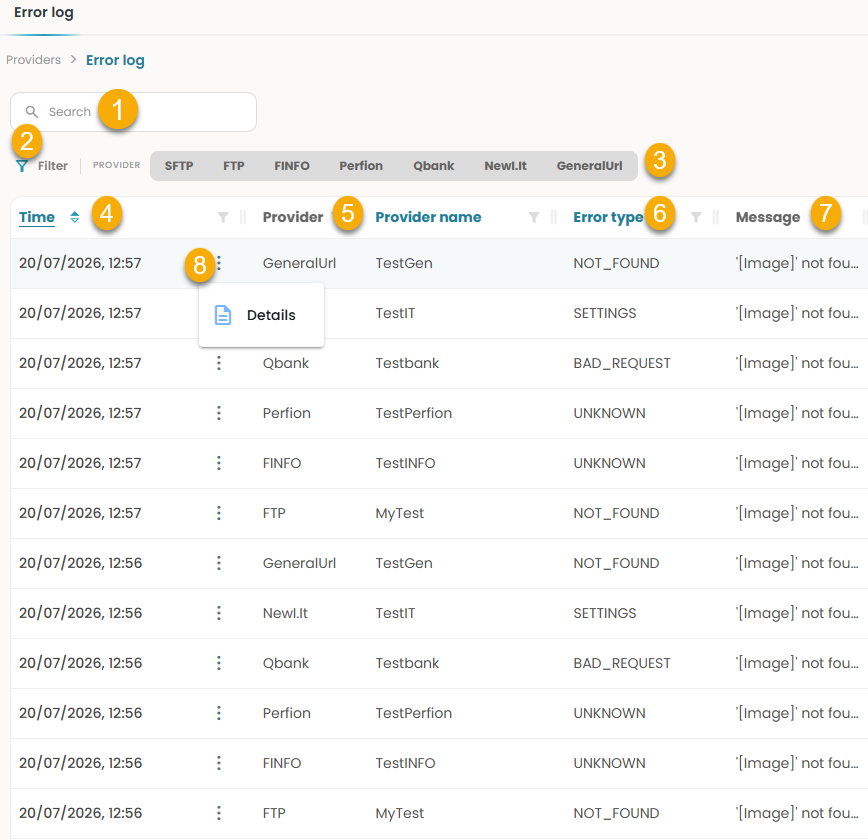
4.2 +Add provider
- Click '+Add provider'

Opens a slide-in as shown below.
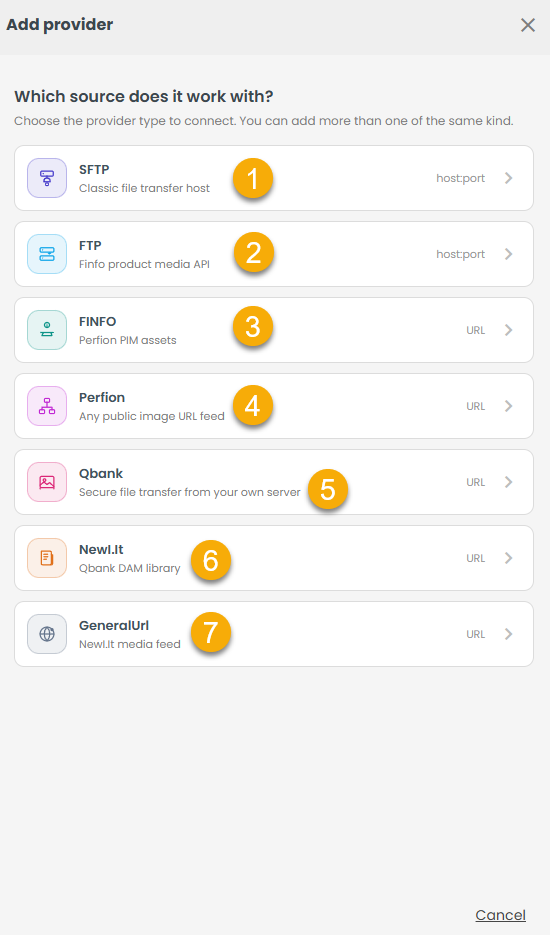
There are 7 types of providers.
A click on the provider opens a slide-in .
Fill in the mandatory fields and save.
The added provider can be seen in the list page of the providers.